Tasty Tuesday: Slow Cooker Teriyaki Pork

Tasty Tuesday: Slow Cooker Teriyaki Pork

We’ve had this recipe multiple times and it is definitely husband approved.  Such a good recipe for when you need a break from cooking chicken this and chicken that.

There is a slaw recipe that goes right along with the pork and I like to make that the night before since it requires a bit of chopping.

Ingredients:

2-twelve ounce pork tenderloins

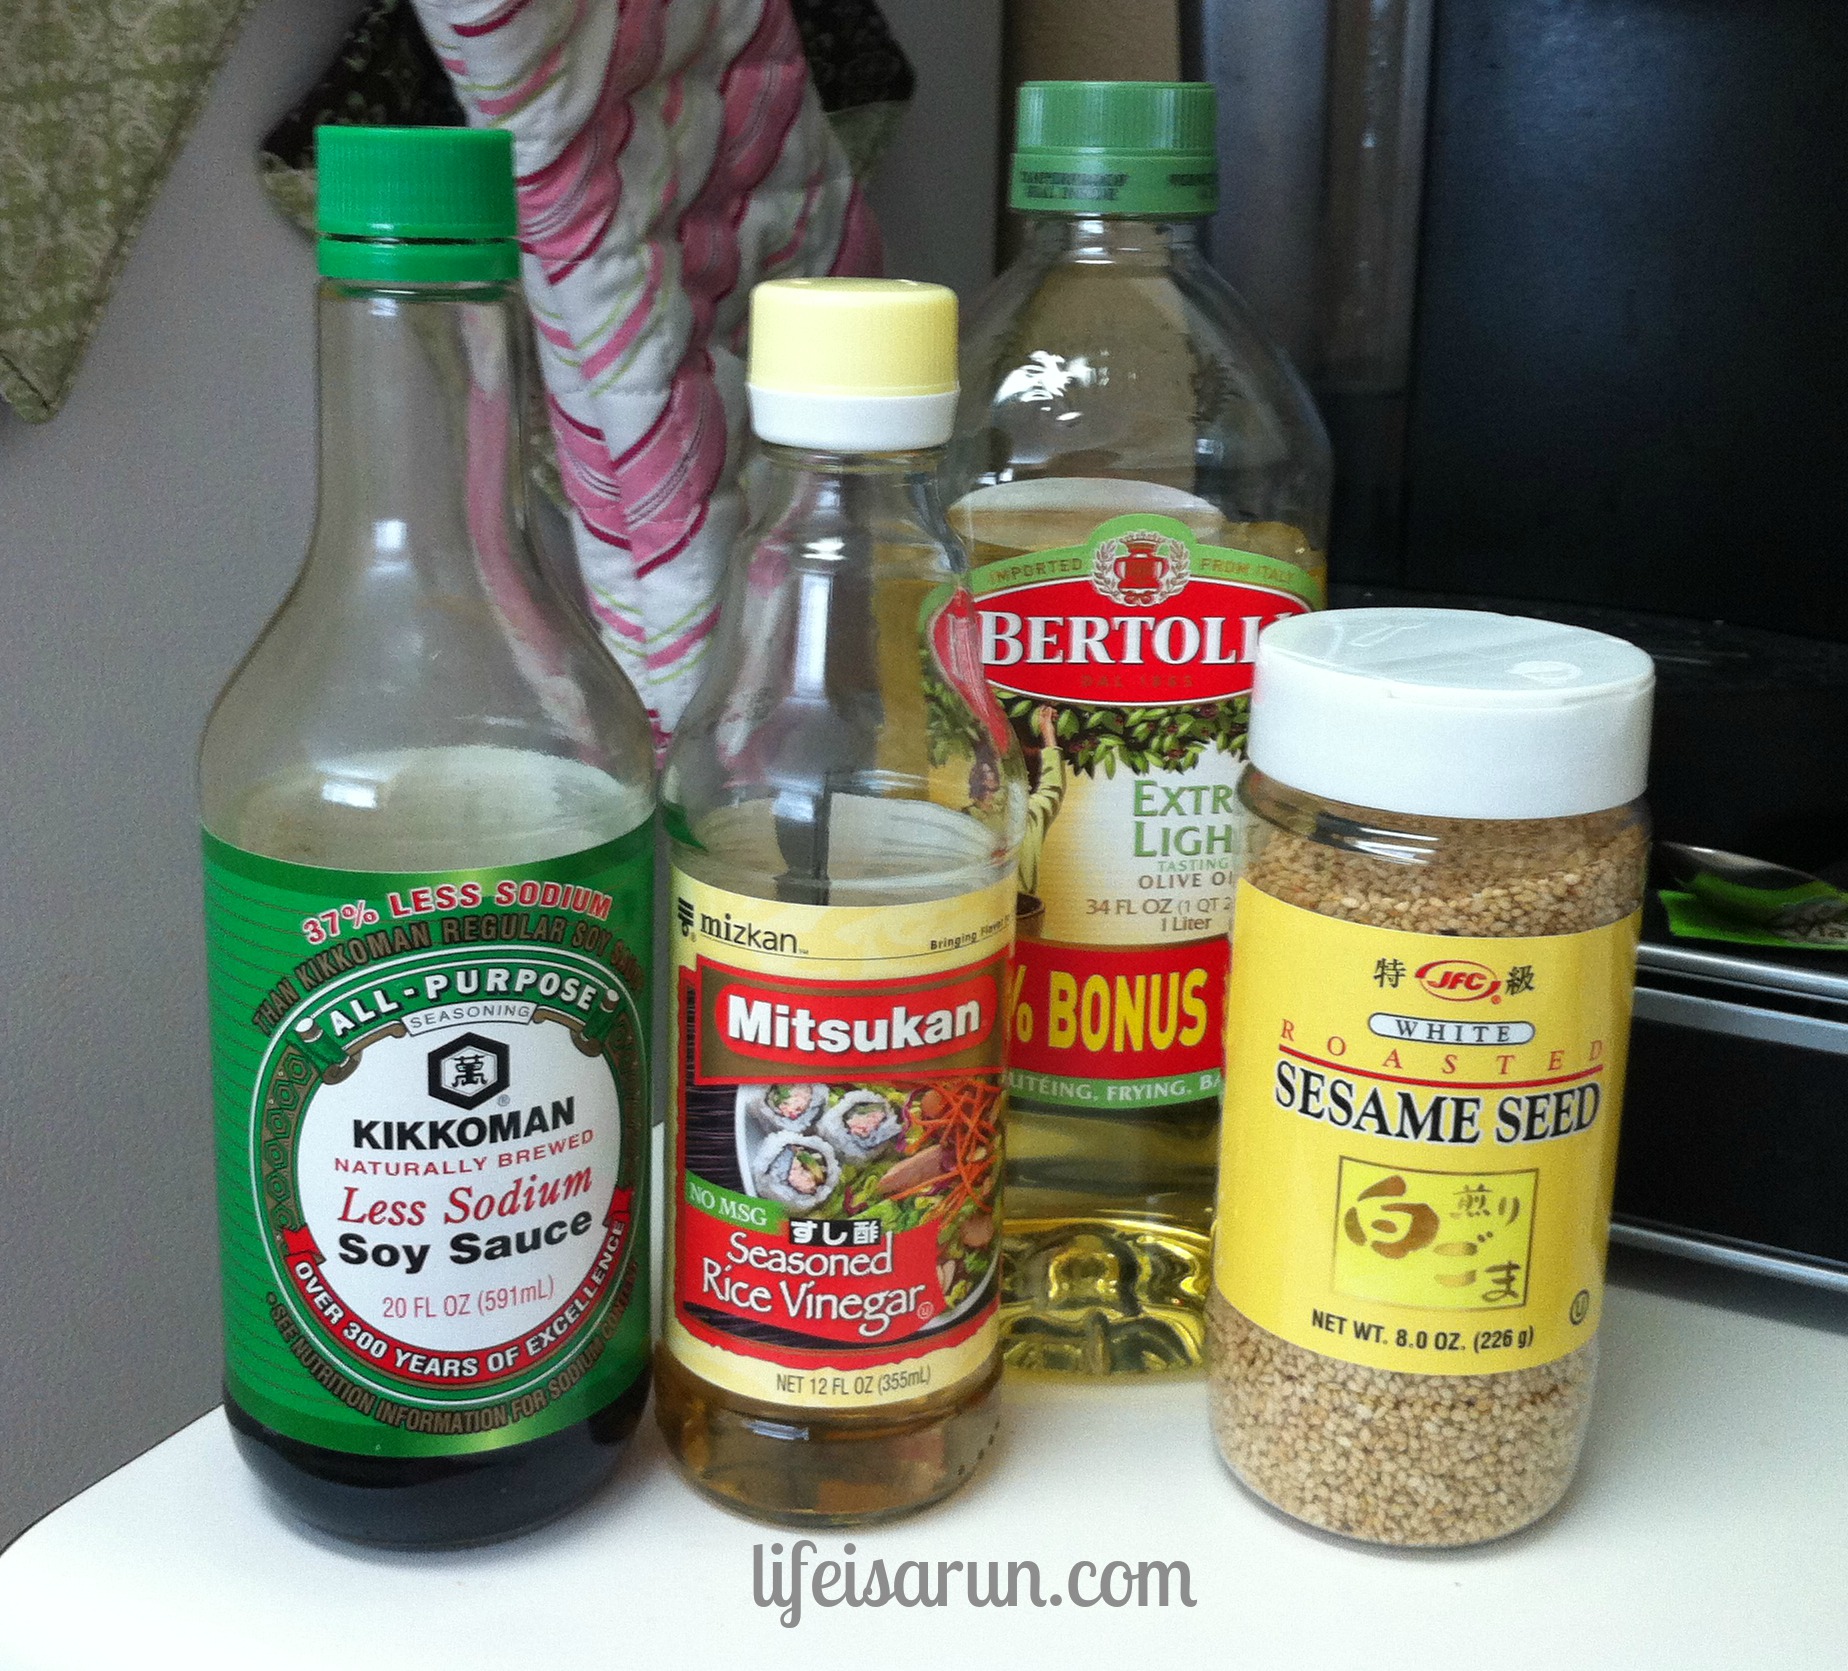
1/2 cup reduced-sodium soy sauce

1/4 cup rice vinegar

3 Tablespoons packed brown sugar

2 Tablespoons olive oil

2 teaspoons grated fresh ginger

2 cloves garlic, minced

1/4 teaspoon ground black pepper

Toasted sesame seeds (optional)


Directions:

In a small bowl mix together soy sauce, vinegar, brown sugar, oil, ginger and garlic.  Place the pork tenderloins in your slow cooker and pour the sauce you just mixed together over the meat.

2013-06-11 09.25.53.jpg

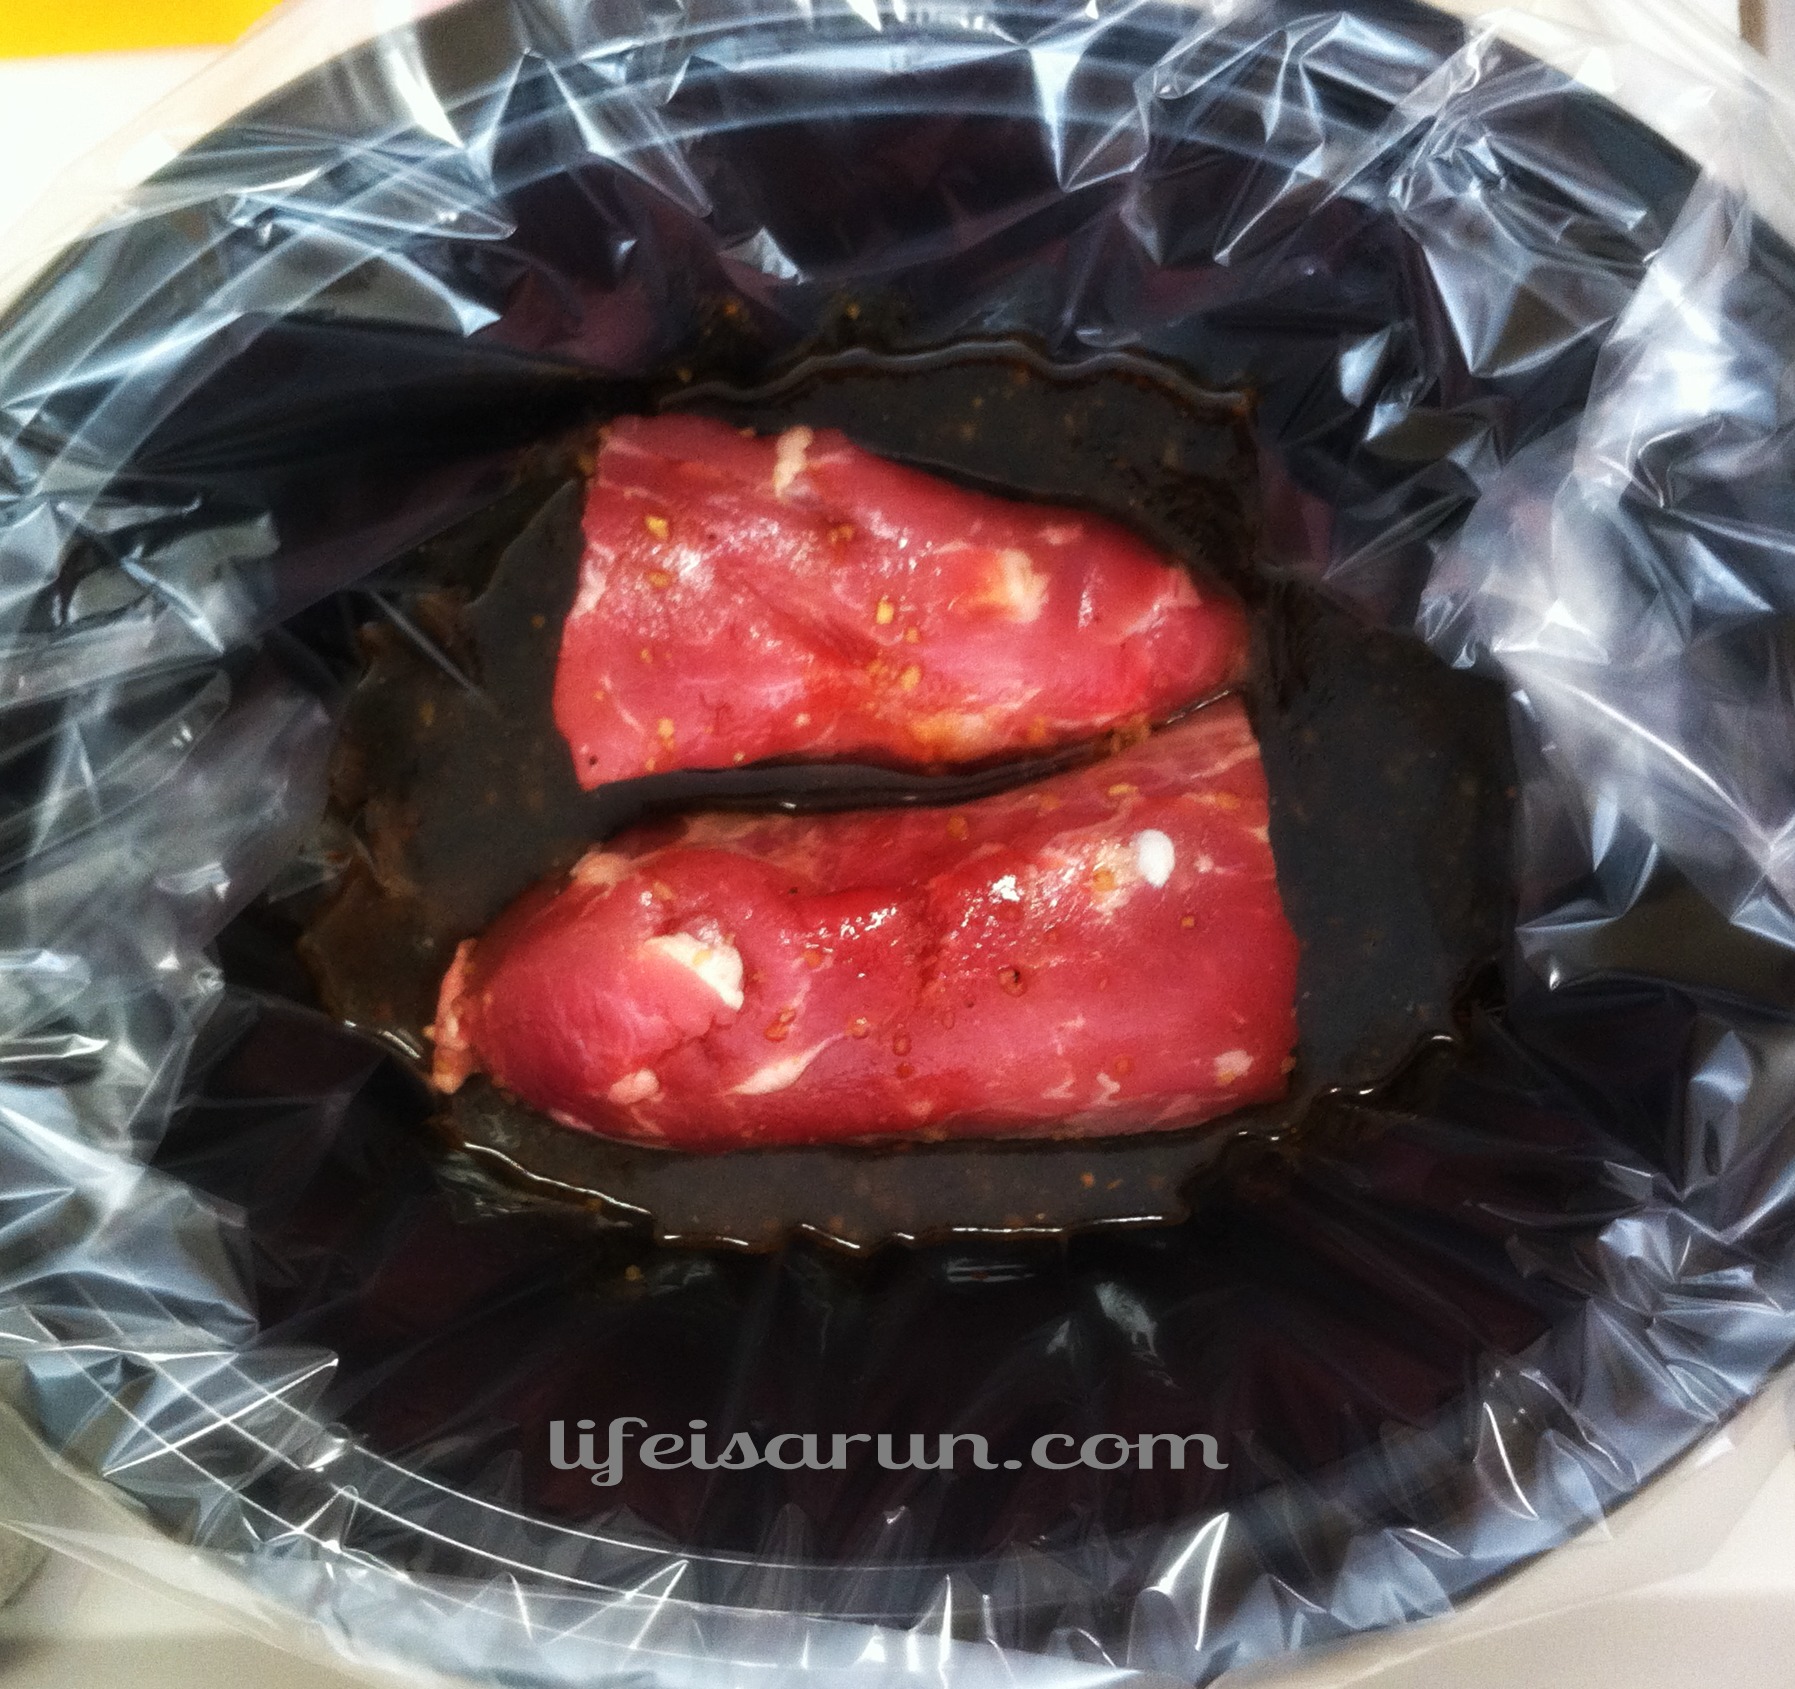
Cover your slow cooker and let cook for 2 1/2 – 3 hours on high-heat or 5 – 6 hours on low-heat.

Once your pork is finished transfer to a cutting board and leave the cooking liquid in the slow cooker for now.  Cut the meat into 1/2 inch thick slices.

Serve with Asian Slaw (recipe below) and drizzle meat with cooking liquid. (Optional – sprinkle with sesame seeds)


ASIAN SLAW

Ingredients:

5 cups shredded napa cabbage

1 medium yellow bell pepper (cut into strips)

1/2 cup shredded carrot

1/2 cup of snow peas w/pods sliced lengthwise

1/4 cup sliced green onion

3 Tablespoons rice vinegar

2 Tablespoons of olive oil

1 Tablespoon of toasted sesame seed oil

1 Tablespoon of reduced-sodium soy sauce

Pinch of salt

2013-06-11 09.22.43

Directions:

In a large bowl you’ll combine all of the vegetables that have been cut up.

2013-06-11 09.23.42

In small mason jar (or similar jar with a screw top lid) combine the rice vinegar, olive oil, toasted sesame oil, soy sauce and salt.  After screw the lid on shake up the mixture.  Pour the mixture over the vegetables in your bowl and toss to coat.

2013-06-11 20.14.49

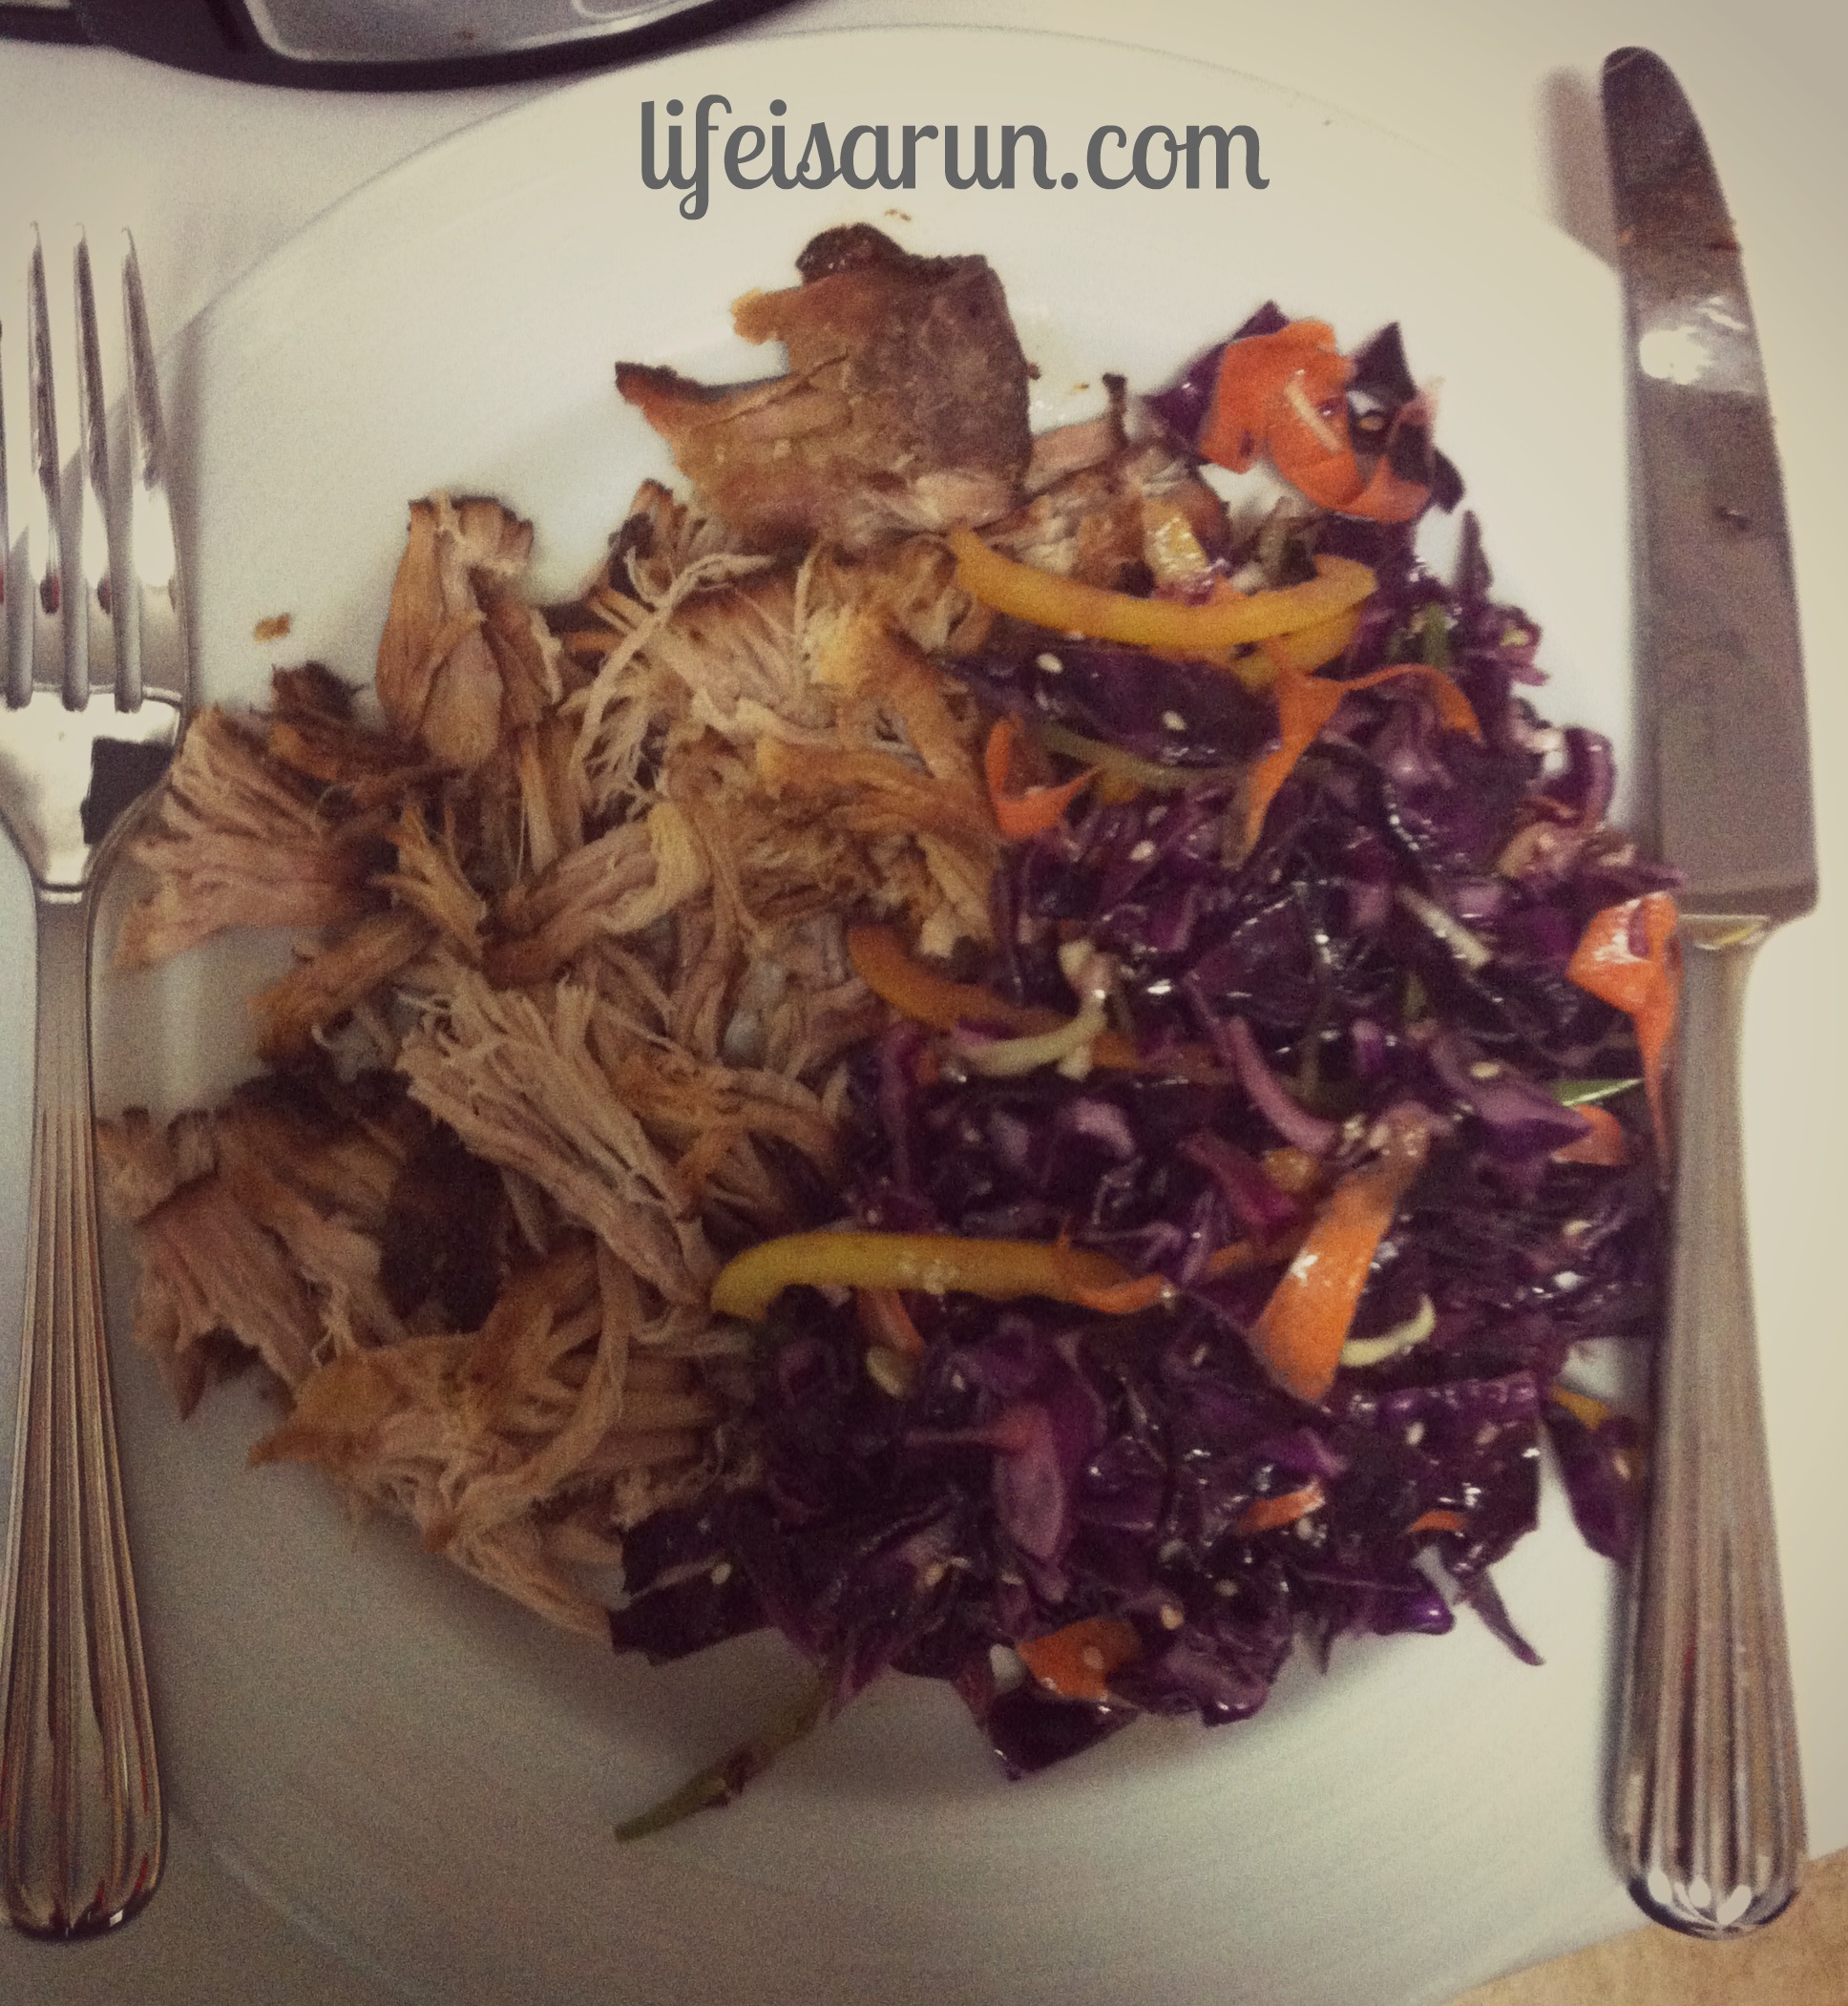
Ok, as you can see I didn’t actually cut my meat into 1/2 inch slices and it’s so tender so it works this way as well!

For a print out of the entire recipe please click here.


September Report Card

September Report Card

Teal –

1. Clean out the back bedroom. Just look at this mess. Enough said and now I am sufficiently embarrassed!

B-: even though it looks like I actually did nothing I did a bunch, hence the decent grade. I got a lot of crap moved out, donated, or reorganized into another room but in the process I moved more things in here. I really need to deal with the fact that my house has no storage and toss some stuff but I am still working on finding homes for things. I’ll continue but I have made progress.

10082013 2

2.  Join Soul Motivation yoga and go 2 times per week. I used to do yoga at 24 Hour Fitness with the guy (Joseph) who now owns Soul Motivation. He left 24 Hour obviously but I have so missed him. It’s pretty far from my house but it’s worth it. Just need to get my butt up there.

B-: Apparently I like this grade today. I am not going to join now because I haven’t been able to actually get there. It’s kinda far from my house and its smack dab in the middle of 635 construction (I’m thinking summer time) and I leave work at all weird hours, I decided to buy his DVD’s. I have heard awesome things about them from his former yogis, so I figured I would try that instead for now. I am still going to try and make the Friday community classes for just $5 and the occasional Saturday for $7 if my dad lets me off early from work! I just got the DVDs yesterday so I’ll let you know how they go!

10082013 1

3. Make healthy popsicles! I am in a search for healthy popsicle recipes! I know summer is basically over but its Texas so I still have awhile! I bought super cool Popsicle molds like a month ago and have not even attempted to use them. This must change!

A: Made them and they are good, kinda tart but good.

10082013 6

(one cup plain Greek yogurt, one pint blueberries, one cup of strawberries, juice of 5 lemons, tablespoon of honey- mix in blender, poor in container, freeze, eat) You can probably use less of each thing because I actually had about a cup too much for my containers.

Beth – 

1. Our house is still a work in progress obviously and I’m pretty positive every month for awhile I could work on a new house project.  This month my house project is to actually make window treatments for at least one window.  I have fabric for two and then remember I wanted to make some for a third window as well.  So I’m starting small with one window and hope I actually accomplish more.

F: My windows are still verrrrryy lonely! 🙁

2. Read two books.  On goodreads I set a challenge of reading 26 books this year and have been on track or ahead by just a liiiittle bit all year long.  Need to keep that up. I also joined a book club a couple of months ago, so I’ll be reading Serena by Ron Rash as one of my books to be ready for our next meeting!

A+: I did it! I read two books except they weren’t the ones I told you about. Ha! Since we posted our goals so late into the month I’d already let my mind forget about the book club book I read for our meeting in early September.  We read Table for Seven by Whitney Gaskell for our September meeting so that was book number 1.  The second book I read before diving into October’s book (Serena) was The Likeness by Tana French.  I read her first book a couple of years ago and I keep trying to spread them out so I don’t run out of Tana French books to read. 🙂  Am I the only dork that does this??


3. YOGA!!  Still with the goals and needing to get them done!

B-: I’ve still been though I did slack off in the last week of September hence the somewhat lower score! 🙂

Tasty Tuesday: Clean Eating Balsamic Chicken & Green Beans

We have had quite a few people asking us about the clean eating turkey meatloaf recipe we posted back in October and we have totally misplaced it! 🙁  Yes, the title of this post has nothing to do with turkey and/or meatloaf, but we are bringing you another recipe that is Advocare Cleanse approved!

So if you are cleansing right now! Try this for dinner in the next few nights?!  If you are not cleansing and just what a tasty and healthy meal then you try this for dinner!

This recipe we found from Clean Eating Magazine which we both love!

Ingredients:

1 lb of fresh green beans, trimmed and rinsed

2 tsp extra virgin olive oil, divided

16 oz button mushrooms, sliced

4 cloves garlic, thinly sliced

1 lemon, zested and juiced

1 yellow onion, cut into 1/4 inch thick rings

1 lb boneless, skinless chicken breast, sliced 1/2 inch thick

2 tbsp balsamic vinegar

2 tsp dried thyme

1/2 tsp sea salt

1. Prep all of your veggies and meat so they are ready to go.

tt bals chick 2

2. Fill a pot halfway up with water and bring the water to boil.  Add the green beans, reduce heat and steam until they are crisp (approximately 5 minutes).  Set aside.

3. In a large non-stick skillet, heat 1 tsp of olive oil on medium heat.  Add mushrooms to saute for approximately 10 minutes, stir occasionally.  When the mushrooms are almost done stir in the lemon zest, lemon juice and garlic and saute for three minutes.

tt bals chick 1

Remove the mushrooms from the heat and transfer to a large bowl.  Combine the green beans and the mushrooms in the bowl and toss well.  Cover the bowl to keep the veggies warm.

4. In a large non-stick skillet, heat the remaining teaspoon of olive oil on medium heat.  Add the onion rings and saute for approximately 5 minutes. Add chicken, thyme, vinegar and salt, and cook, stirring often, for 8 minutes or until the thickest part of chicken is cooked through.  Remove from heat, serve with green beans and any remaining juice from the skillet can be poured over your chicken and/or veggies.

tt bals chick 3


And voila! Dinner is served.  Sorry, we were too hungry to remember to capture a photo of the final product, but it was also husband approved!

Expect to spend about 35 minutes preparing the food and 35 minutes cooking.

For a printable version of the recipe please go HERE.

Tasty Tuesday: Seafood Gumbo

Hello, January! And the need to get off some of those holiday pounds!  In an effort to do so the other night for dinner I turned to one of my handy dandy Tosca Reno Clean Eating cookbooks to find something I could make for dinner. Tosca’s gumbo completely jumped out at me especially since it’s been cold. It sounded hearty and just what we needed.

First off you’ll need the following ingredients:

3 Tablespoons olive oil

1 onion, chopped

2 stalks celery, chopped

1 large green bell pepper, seeded and chopped

4 large cloves garlic, chopped

1 1/2 teaspoons sea salt

1 teaspoon freshly ground black pepper

1 teaspoon Old Bay seasoning

1/2 teaspoon cayenne pepper

2 Tablespoons tomato paste

4 cups low sodium chicken broth

12 oz cut frozen or fresh okra (about 3 cups)

1 teaspoon chopped fresh thyme

2 bay leaves

1 lb 51-60 count shrimp, peeled and deveined

12 oz low fat all natural fully cooked andouille sausage

Steamed long grain brown rice, for serving

Hot sauce, to garnish


IMG_2506

This recipe can be made using either a Dutch oven or a large heavy-bottomed pot.  I do not own a Dutch oven so large heavy-bottomed pot it was for me!

To start add olive oil and flour in the pot, and cook, stirring occasionally.  Cook until the mixture is brown and toasty, so roughly 8 minutes.  Add onion, celery, pepper, garlic, salt, pepper, Old Bay seasoning and cayenne.  Cook the vegetables until they are tender, roughly 10 minutes.

IMG_2505 (1)


IMG_2507

Add tomato paste, broth, okra, thyme and bay leaves.  Bring the mixture to a boil, stir to combine ingredients and then reduce heat to simmer, uncovered, for 20 minutes.

IMG_2508

Increase heat to high.  Add shrimp and sausage and gently stir to submerge them into the hot liquid.  Cook for 3 -4 minutes until the shrimp are cooked through and the sausage is heated through.

Taste and add any additional seasoning if needed.  Remove the bay leaves and throw them away.  Serve over brown rice.

IMG_2512


For a printable version of the recipe please go HERE.

If you are in Texas today and enjoyed some of the snow maybe this is juust the recipe you need for tonight’s dinner!  It provides lots of good flavors and just as tasty as leftovers!

Tasty Tuesday: Bridal Shower Foods

You might have seen yesterday, that this weekend was Beth’s bridal shower thrown by the bridesmaids and since I’m a bridesmaid (highly doubt you would have missed that by now) I had a job to do. I volunteered to do the dessert part of our spread.

Kate (Beth’s sister) had us all pick what we wanted to do so I chose Cake balls and Oreo cookie balls. I’m on Pinterest so I totally thought it would be doable. I am going to give you the recipes and the how to make said cake balls, and even a few pointers of what they do when they completely fail at 10pm the night before the shower and a race you have to wake up at 5 o’clock to get to!

Kate is also blogging today about the other shower snacks! You can find that information over on her blog! You should totally check it out for any future snacking you would like to partake in and/or some other awesome recipes!

Oreo Cake Balls

1 package of oreos
1 8 oz package of cream cheese softened
White melting chocolate (for your sanity DO NOT buy this kind )
You really should probably buy this kind instead (trust me!)

How to:

Crush the Oreos in a blender, or if you are angry at the world you could pound them with a hammer. Just make sure they are as small as you can get it.

Mix in the entire package of cream cheese. It will end up being a ball of cookie mush.

Ball the mixture into the size you would like and then place in the refrigerator. I would recommend freezing them over night because when they are not hard enough they fall through the sticks and it is a holy annoying mess. You could also just never put them on sticks and life might be easier.

So you might guess, the next step is to place them on sticks and dip them in the melting chocolate and you are done.

Hint: Keep refrigerated until you are ready to serve if they are on sticks they won’t stay!

Cakeballs

Cake Mix
Icing
Melting chocolate (again use the candy melts not the other one)

How to:

Bake the cake using the regular directions. Once baked, let cool and crumble the cake into the smallest pieces that you can.

Mix in the icing- the original way I saw this was to use the entire jar of icing, I think this was part of the reason that these bad boys didn’t work, sooooo in the future I will probably use about half so that they are not as moist (eww I hate that word)!

Once mixed, ball the cake and freeze. Once frozen dip in the melted chocolate and you are done!

Hint: too much icing in the mix, not freezing and only refrigerating, and using the wrong chocolate will give you a holy mess that looks much like the picture! While my cake balls failed miserably, I did figure out how to fix them by using the hints above.

If all else fails you could always get your husband on the phone with every Starbucks that will wait for you to get there before they close and ask them for all their cake balls. Then you can buy melting chocolate and cover them in whatever color you need. See! No one would ever know!

I figured I would include some extra pics of the shower just because it was so cute! Beth also has a super crafty Sister in law (She blogs too- Shocking, I know) Tiffany made tons of cute decoration pieces and snacks as well!

20120918-080911.jpg

20120918-080924.jpg

20120918-080934.jpg

So there you have it! The showering aspect of our weekend! 🙂  Please be advised we are not claiming cake balls are healthy….we are sharing the recipe and parts of our lives right now with you. Ha. Tomorrow we’ll finally let you  know ALLLL about Tour des Fleurs! 🙂

Oh, and additionally it should be noted that Teal’s Oreo cakeballs were WAY BETTER than Starbucks! Sorry Starbucks! We know we are already kind of a traitor to you with our Coffee Bean & Tea Leaf obsession! Only 10 more days until a CBTL opens in Dallas! 🙂  Ok, that’s all from us for real now.

Tasty Tuesday: Green Chili & Vegetable Soup and Green Juice

This post is brought to you by the color green!

So the pictures on this recipe are a little weak. Something mysteriously happened to my iphone and in the place of the finished products is a picture of strangers. How it got there is beyond me, but never the less the pictures are gone.

If you follow us on instagram you might remember from a couple of weeks ago, we used diptic to show you what we each had for lunch. This was mine! Green Chili and vegetable soup and green juice (not as scary as it sounds!)


Green Chili Vegetable Soup

Large green chili (whatever heat you like)
8-10 red potatoes (the little ones)
Garlic clove
Fresh green beans
Can of corn
48 oz Can of red diced tomatoes
1 can of peas
1 can of rotel
1 lb of lean ground beef or bison
2 carrots cut into slices

20120911-075934.jpg

20120911-075954.jpg
I am not big on listing 8 million spices and their exact quantities; I did put garlic, sea salt, pepper, a little cumin, and chili powder. This is up to you. Really I don’t think it needs much and depends on the person- this is clearly my non-chef talk

To make: This is so easy! Brown the meat in a pan and place in the crockpot after it is finished. Add in remaining ingredients and cook for 6-8 hours depending on what temperature you need to set it at and what time you put it in. The meat is cooked so really all you need to do is make sure the potatoes finish.

I placed mine in mason jars and ate the soup for lunch all week.

Green juice

3oz spinach
3oz kale
½ large cucumber sliced
2 green apples
1 lemon.

To make: Cut apples in to cubes, peel lemon and slice cucumbers (note: you only have to do that part if your juicer is old school like mine and you have to cut and peel) and throw everything in the juicer. If you don’t have a juicer you can blend and then drain out the chunky parts. If I do it this way I usually blend and drain twice and you might have to add a little water. It tastes exactly the same but the texture is different.

**Advocare Note: If you make the Green Chili & Vegetable Soup during your 10 day cleanse either leave the potato out or you’ll need to count that as your one carb for the day!!**

Tasty Tuesday: Mini Ham & Cheese Quinoa Cups

Thank you pinterest for this recipe find which also lead to a new blog — Iowa Girl Eats!  Not sure how we haven’t stumbled upon Kristin’s blog or her on twitter yet, but glad we finally did!  Not only is she giving her readers tasty recipes to try but she’s also a runner – like us!

Recently I was on the search for some sort of mini quiche, mini frittata, or something of that nature for a baby shower and I stumbled upon the mini ham & cheese quinoa cups. I gave them a test run the week of the shower,  thought they were fabulous and was ready to count them as a part of my contribution to the shower food!

This recipe makes 28 mini cups and calls for –

Ingredients:

2 cups cooked quinoa (about 3/4 cup uncooked)

2 eggs

2 egg whites

1 cup zucchini, shredded

1 cup shredded sharp cheddar cheese

1/2 cup diced ham

1/4 cup parsley, chopped

2 Tablespoons parmesan cheese

2 green onions, sliced

salt & pepper to taste

To get started preheat that oven to 350 degrees and get going on cooking and chopping up the ingredients!  Follow the instructions on the box of your quinoa to cook it correctly.

My favorite vegetable chopping/slicing contraption!!

Combine ALL of the ingredients into a large mixing bowl and mix it all up!

Grab your mini muffin pans and spray them with a non-stick spray and don’t just lightly spray make sure you really cover the pans with the non-stick spray.  Begin spooning out the mixture into each muffin pan.

I used normal size muffin pans on my first go ’round

The recipe calls for cooking them about 15-20 minutes, but I either have always had the slowest cooking oven in the world or….well, I don’t know what.  I definitely left them in the oven for more like 25-30 minutes, so just make sure to watch the sides and when they start to turn a golden brown you are safe to take them out of the oven.  Give them about 5 minutes to cool then remove the quinoa cups from the muffin pan.

There you go! Cute little delicious Ham & Cheese Quinoa Cups.  Next I’ll have to get brave and experiment with different ingredients!

And here is how the nutrition stacks up on the quinoa cups –

Should also add that these mini cups reheat well. If you were to make them for say a baby shower or something similar like I did the mix does well if you make it the night before, refrigerate and cook them the next day.  Or you could simply make about half the recipe, save the rest of the mix and make it the next day.

Are you a big quinoa fan? What’s your favorite recipe involving quinoa?

Tasty Tuesday: Stuffed Bell Peppers

This is something that I make all the time because it is super easy and I can eat it for lunch or dinner throughout the week. It’s a very easy way to get tons of veggies and protein during that day. You can easily add or change the veggies to your liking or even what you have left over in the refrigerator!

Here’s what you do (nothing is really exact because it doesn’t have to be!)

Cut 6 bell peppers in half (any color), take out the guts, and place in a glass baking pan.

20120710-090803.jpg

Cover the bottom of the pan with water about a centimeter or so high- this keeps it from burning the bell peppers in the oven

Grill 1 pound ground beef, bison, or turkey in a pan.

20120710-090929.jpg

When your meat is about half way browned add your veggies. I did a can of corn, black beans, and diced tomatoes. I also had left over rice with carrots and green beans in it so I added about a cup of that so it wouldn’t go to waste. Mix everything in. If you like spice, add salsa and green chili at the very end.

20120710-091030.jpg

20120710-091039.jpg

Stuff your peppers. Fill them as much you can! I always end up with extra meat and usually just make tacos with it the next day.

20120710-091150.jpg

Place in the oven for 30 minutes on 375. If you like, you can add cheese to the tops during the last 5 minutes.

Nutrition facts :This is from entering the ingredients in myfitness pal and calculating for 6 servings- 1 full bell pepper each

Calories: 298

Fat: 5.9 grams

Carbs: 36.5grams

Do you make stuffed bell peppers? What do you different from this recipe?

Tasty Tuesday: Crockpot Chicken Taco Meat

A couple of weekends ago we got together with some of our friends and had a taco dinner much like our wine dinner we had back in January.  We had brisket tacos and chicken tacos, but the chicken taco recipe*** was such a breeze we HAD to share this one with you!  Especially since there are probably a lot of things you could do with the chicken once it’s cooked besides just using it as taco meat.

Ingredients:

3 Tablespoons of taco seasoning

1 cup of chicken broth

1 pound of boneless and skinless chicken breasts

Directions:

Clean your chicken and trim off that fat!  Pour your chicken broth into your crockpot then pour in the taco seasoning and let it dissolve in the chicken broth. Then place your chicken breasts in the crockpot.

Not the most exciting picture, but the chicken broth should pretty much cover your chicken breasts and who doesn’t love crockpot liners for an easy clean up??

Put it it on low and cook for 6 hours.  Once it’s finished cooking you’ll have such tender chicken it’s literally falling about trying to get it out of the crockpot.

Then serve it to your guests should you be having a taco dinner party or divide it up to eat throughout your week!

If you use this same recipe and create something other than just the chicken taco meat being sure and SHARE IT with us!! We would love to know!  Hope you enjoy this recipe and how easy it really is!

**source

Tasty Tuesday: Skinny + Enchilada = Healthy Goodness

For a couple of months Beth has had some food goals – one being prepare your meals and the most recent one was try two new recipes for weekly meal prep!  Well she took her search to google and decided to try and find a skinny enchilada recipe which quickly led her to recipe created by She-Fit!  Ruth has some other great recipes listed on her blog that I hope I find time to make as well!

But back to the skinny enchiladas – look through the ingredients and everything sounded very do-able!

To get started you need to pre-heat your oven to 350.  Then lightly spray a 9×13 baking dish.  After you chop up your onion and bell pepper you are going to saute them in a pan.  Once the onions are a lightly brown mix your veggies with the Greek yogurt, chicken and cheese (if you are like me and boiled your chicken in chicken broth to cook it obviously that is going to be your real first item on the list to accomplish).

You’ll want to evenly spread out your mixture into 9 tortillas, roll them up and place them seam down in your baking dish.  Ruth’s recipe calls for wheat tortillas, but where would the fun be if I didn’t try something different??  I used corn tortillas instead! I have actually made this recipe twice now and the first go round I used Tia Rosa brand tortillas which pretty much broke immediately after being set down in the baking dish.  One the second go round I used Mission corn tortillas which had very little if any breakage of the tortilla!

Next you want to evenly coat your tortillas with the salsa and Greek yogurt mix then sprinkle with cheese! Voila! Your enchiladas are ready to bake!  The recipe calls for placing foil over the dish which I didn’t do, but maybe I should one of these days and see if it makes a difference.  Nonetheless, bake those bad boys for 15-20minutes.  Maybe in an effort to give some love to Ruth and her blog you should click here to find out about the nutrition facts!

One other little fun thing about this recipe is you can totally change up the taste of it simply by using a different type of salsa!  My first time making this recipe I decided to use a salsa verde, but the second time after perusing all the salsa choices at my local grocery store I chose to buy a local brand salsa – Hazelwood’s Smoked Chipotle.  The flavor was completely different and just as delicious from that one change up!

Have you tried this version of skinny enchiladas?  What’s your favorite skinny recipe to make?